How to Disable USB Ports
- In the first step, you have to launch the Start menu and then type Device Manager. Click on Device Manager or open it using the shortcut keys combination "Windows + X", click on device manager
- Once the device manager is launched, you have to click on the Universal Serial Bus Controllers and there you will see different device options available in it as depicted in the figure below.
- %SystemRoot%\Inf\Usbstor.pnf
- %SystemRoot%\Inf\Usbstor.inf
- Start Windows Explorer and find the %SystemRoot%\Inf folder.
- Right-click on the file in Usbstor.pnf, then press Properties.
- Click on the Security tab.
- Add the user or group you want to set Deny permissions to in the Group or UserNames
- Click on the Deny check box next to Full Control in the UserName or GroupName Permissions list, and then click OK.
- Open the CurrentWare Console

- Select the computers or users you would like to control
- Under the AccessPatrol tab, select Block File Transfers

- Under Enter File Name or Extension, type in the desired extension (CSV, BAK, CAD, etc) or file name (client-list, archive, etc) that you would like to block
- Click Add, then click Close
- Click Apply to Clients and then click OK
Ways to Enable or Disable USB Drives or Ports in Windows
1. Enable/Disable USB ports using the Registry editor
USB ports can be enabled/disabled using the registry editor by following the steps mentioned below:
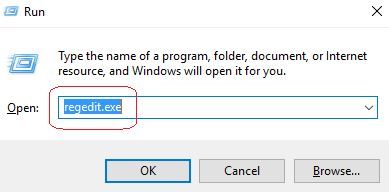
In the first step, you have to go to the Start menu and then open Run dialog box or Press "Window + R" combination to directly open the RUN window.
Then type "regedit.exe" and then click on enter to open the Registry Editor as shown in the figure below.
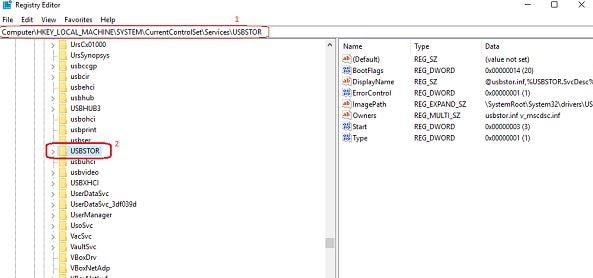
 Registry Editor Window will be launched, now Navigate to the following path:
HKEY_LOCAL_MACHINE > SYSTEM > CurrentControlSet > Services > USBSTOR
Now you have to click on the start option to open the "Edit DWORD (32-bit) Value" Window.
After pressing Start, you have to change the "value data" field to ‘4’ to disable the USB Drives or Ports and then click on OK, as depicted in the figure below. Once done USB drives and ports on your system will be disabled.
To enable back the USB Ports or Drives, change this data value to 3 and then click on OK, as depicted in the figure below. Once done USB drives and ports on your system will be enabled back.

You can restart your system to check the applied effects.
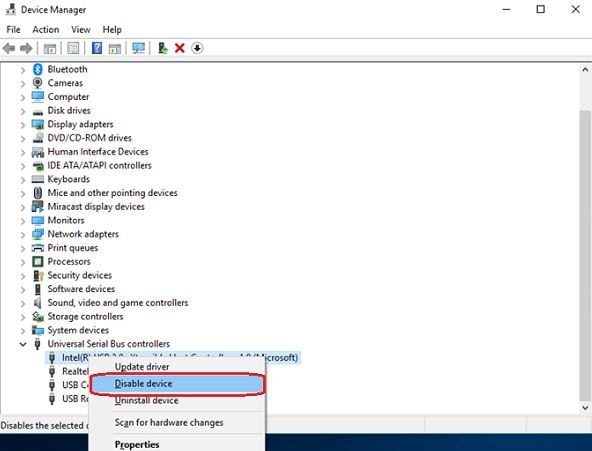
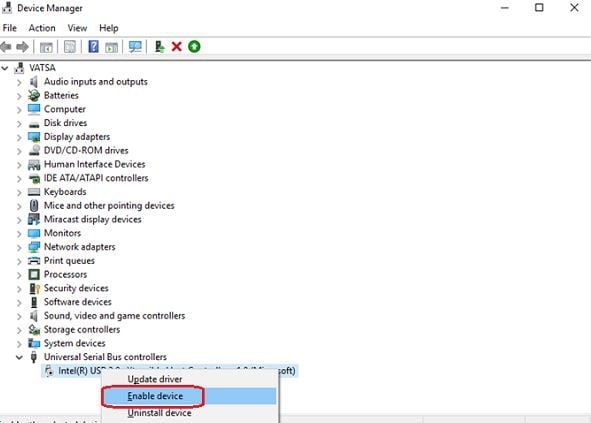
2. Enable/Disable USB Ports using Device Manager
You can also enable/disable your USB ports using the Device Manager.

Right-click on the USB 3.0 (or any other mentioned device in your PC), and then click on Disable device to make the USB ports and drives disabled on your system., as depicted in the figure shown below.
Right-click on the USB 3.0 (or any other mentioned device in your PC), and then click on Enable device to make the USB ports and drives enabled on your system., as depicted in the figure shown below.
3. Disable/Enable USB ports by uninstalling USB Mass Storage Drivers
A system can be protected from malicious users on a high scale like in school, office, etc., by uninstalling USB Mass Storage Drivers. You can just uninstall these drivers and when anyone would try to plug in the USB drive then Windows will prompt him/her to install the USB drivers. Later on, you can install the drivers back to make the things work (USB devices detected) again.
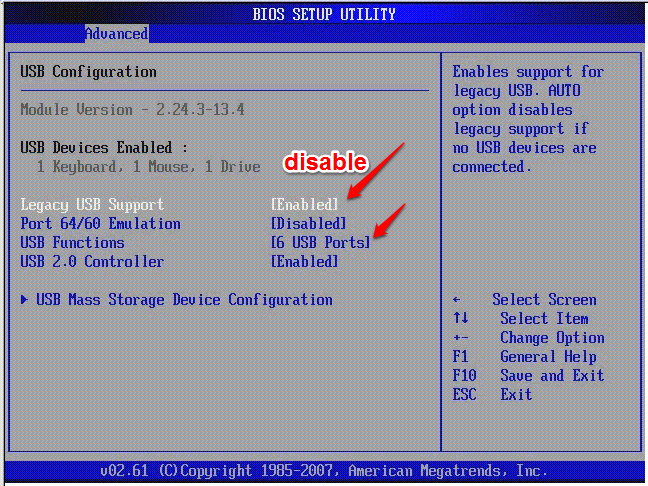
4. How Do I Enable USB Ports in BIOS
Some vendors provide an option in BIOS/UEFI to enable or disable the USB ports on the system. In other cases, you may also have accidentally disabled usb ports. Boot into the BIOS.UEFL to check if such an option or feature is available on your system. You can check the user manual of your PC to see if the feature to enable or disable the USB ports is available in the BIOS.
5. Disallow Users to Connecting USB
Use one or more of the following methods to block users from connecting to USB storage devices, as appropriate for your case.
If there is no USB storage device already installed on your computer
If a USB storage device isn't already installed on the computer, assign Deny permissions to the following files to the user or group and the local SYSTEM account :
Users can not install a USB storage device to the computer when you do this. To assign Deny permissions for the files Usbstor.pnf and Usbstor.inf to an individual or group, follow these steps:
6. Disconnect USB
It is impossible to disconnect all the USB ports from the motherboard; all you can do is to disconnect those exist on the top and front of the computer by plugging out the cable from the USB header. Disconnecting these ports prevents people from miscuing them. You can disallow USB by changing group policies, third-party applications/tools are also available for disabling USB ports on Windows 10, i.e., SysTools USB blocker and USB block,
How to Prevent Specific Files From Being Transferred From USB Ports
AccessPatrol allows you to preventspecific files from being transferred to external devices based on their filename or file extension.
By default AccessPatrol’s Block File Transfers feature will not apply these restrictions to devices that have been added to the Allow List.
If you would also like to block these file transfers to authorized USB devices you simply need to click the “Apply Block File Transfers on Allowed Devices” checkbox before applying the policy to the clients.


perfect
ReplyDelete